Hi friends this is your tech expert Neil. In this video article I will show you how I repurposed my old android tablet into a smart digital photo frame. I had this 4-5 years old android tablet lying around in my drawer gathering dust. This tablet costed at that time around $40 -$50. It was in working condition except the batteries which had stooped charging. I thought let us put it in some good use. So to get around the battery problem I modded the tablet by soldering internally a USB power cable in place of the lithium ion battery and powered it with a standard 5 V 2 Amp USB charger. Checkout the detailed post showing you how to power your android tablet without a lithium ion battery. (coming soon)
Anyway with the tablet power sorted. The end result was a photo frame that automatically scrolled through photos zooming in on the faces and also adding new photos as soon they are clicked. This digital photo frame I have thought was for my parents. This smart photo frame could scan through my entire photo collection and pick those photos in which one of my parents are present. And as soon as a new photo of my parents are clicked they would also be automatically added to this digital photo frame. All these cool feature is possible by using google photos and an android app fotoo. I will also be converting all my old non digital photos to digital so that those can also be displayed on this album. This project will also be coming soon subscribe to our channel and blog to get yourself alerted as soon as we release it. Okay now lets get back to this project.
Things Required
You will require
1. A Working Android Tablet
It should have a battery which can work with when plugged. Also the WiFi should be working as we will be using google photos.
2. Home WiFi Network
Using the fotoo app we can load locally stored images on your android tablet but then you will not get the cool features of of google photos.
3. Fotoo App
Download From Here:https://play.google.com/store/apps/details?id=com.bo.fotoo
I have tested several other photo slideshow app but I found this one the best that can literally turn your tablet into a smart digital photo frame. There both a free and premium version. The free version has got almost all the features but there are few limitation. The premium version does not cost much only 2$ that is at the time of writing this blog. And at 2$ I would recommend going with the premium version. Will be talking about the difference between the free and the premium version. Check out bellow
4. Google Photos Account
You will have to upload all your photos to google photos if you do not already have them. In this article I will assume you are aware about the basics of google photos and you already have your photos uploaded. If you are not aware of google photos and would like to know how to use it stay tuned we will be shortly releasing a beginners guide to using google photos.
Steps to Create a Digital Photo Frame
Step 1: Creating a live Digital Photo Frame Album in Google Photos
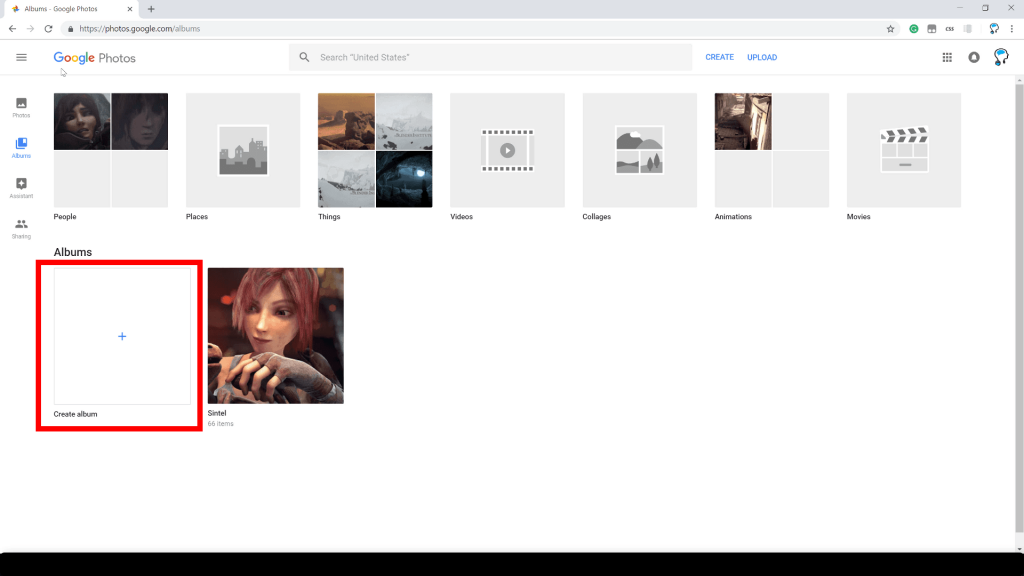
Once you add photos on to google photos within a week to 15 days google photos should scan through your photos and identify the persons present in the photos using face detection. Once you have the people whom you want to add to the digital photo frame detected in the google photos people section. Just go to the albums section and click on the plus icon to create an album.
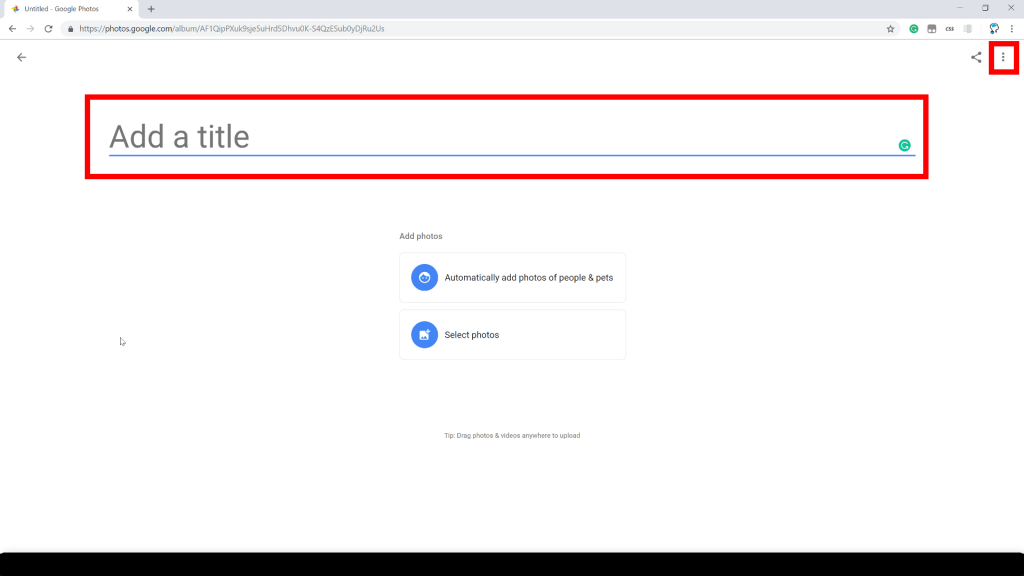
In the add a title section give any appropriate name to the album. In my case I have named it as digital photo album.
Then click on the three dots icon at the top right corner.
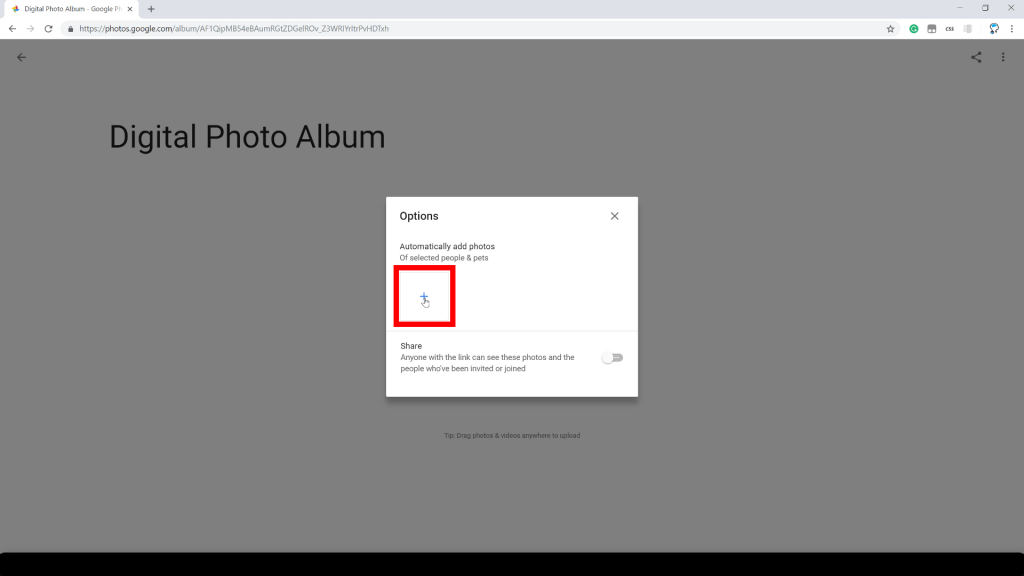
Then click on the options and then click on the plus icon under automatically add photos of selected people and pet.
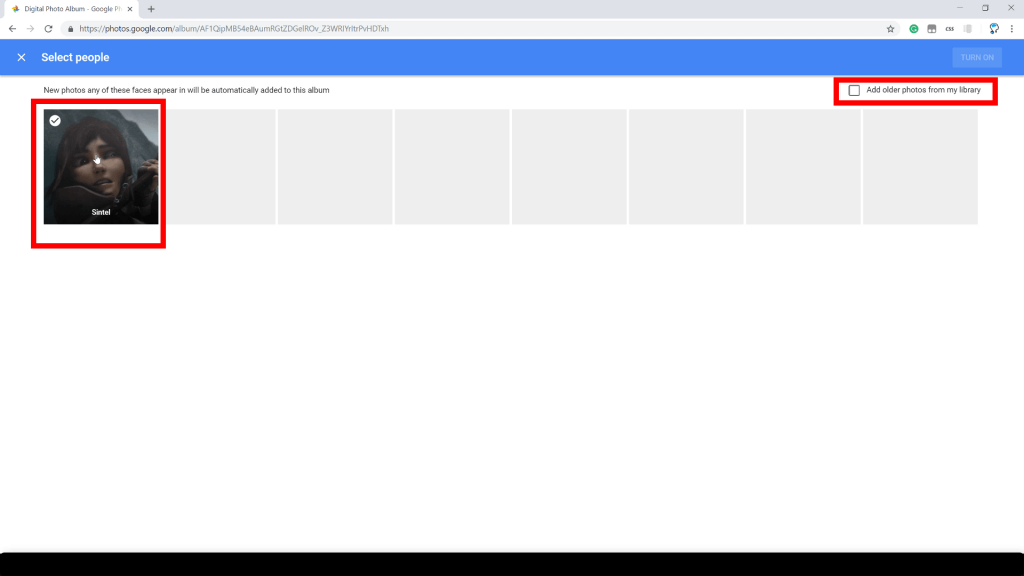
Now select the people of whom you would like to view photos in the digital photo frame also make sure to check the checkbox add older photos from my library.
After doing that click on Turn On. After this step all the photos of the selected person will be added to the album automatically. It will take sometime wait for a day.
Step 2: Configuring Fotoo app
Once you have downloaded and installed the Fotoo app from the play store. The next step is to configure it so that it can display the photos from the newly created google photo album.
Click on the app Icon to launch it
On first run it will show you some popups for making you aware of the interface. Just click okay to dismiss the prompts.
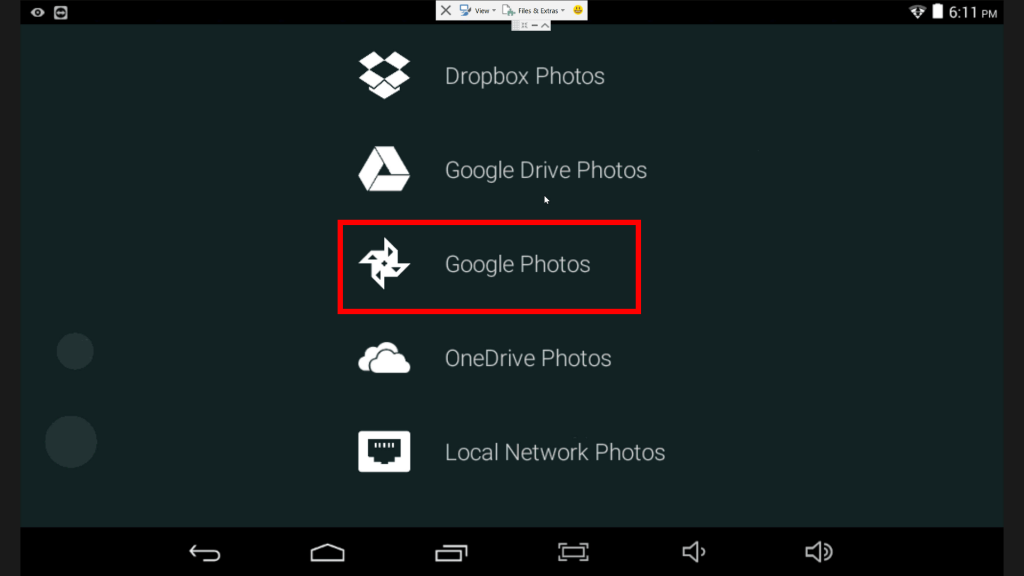
Okay now just tap to bring up the photo stream selection window just select google photos.
It will ask you to select your google photos account. Once you have selected your google photos account it will ask for couple of permission for accessing your photos just click allow to grant them.
Once properly authenticated click on next to go to the photo album selection screen.
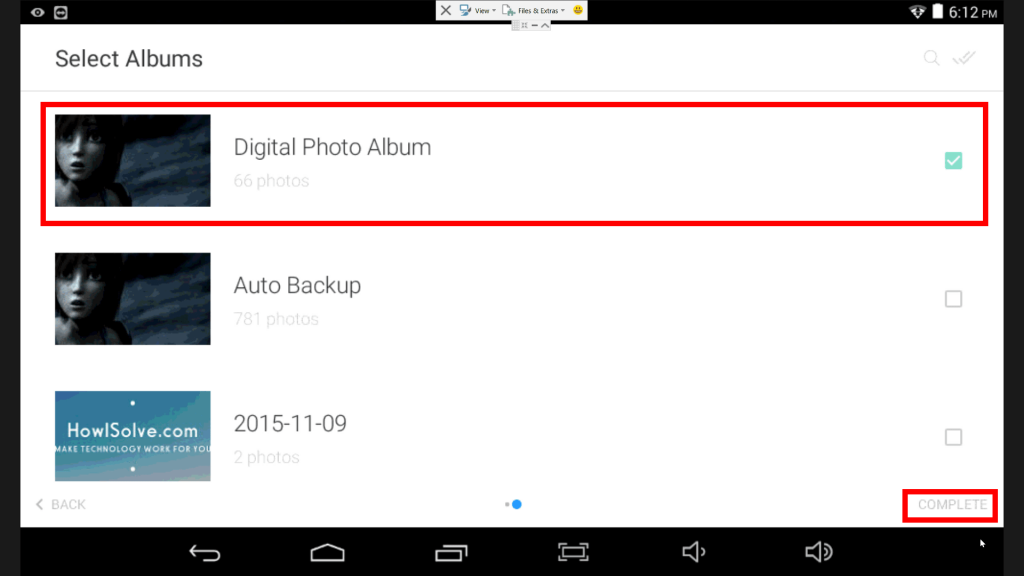
Select the album that we just now created in the above step. In my case I had named it digital photo album. Click on complete.
And now your photo slideshow should start. We will make some changes in the default settings which I feel are necessary.
Step 3: Optimizing the Fotoo app Settings
To open settings tap on the screen this will pause the slideshow and you will be shown a new screen just scroll down and tap on the gear icon.
Display Effect
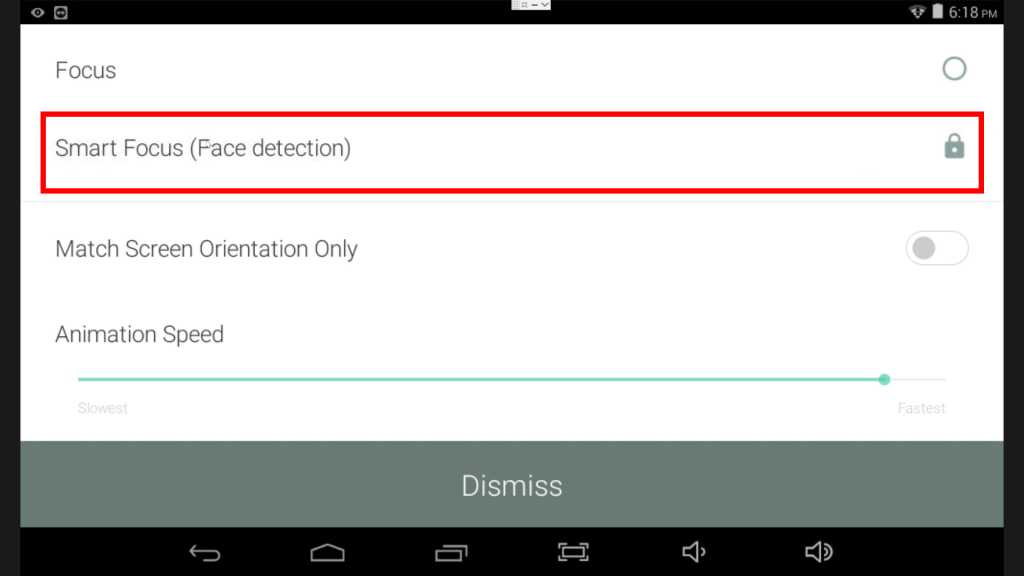
Tap on Display Effect under this the default selected effect is Pan. Swipe down at the very bottom you will find the effect Smart Focus (Face Detection).
What this does is it detects the faces present in the photo and then try to Zoom in and Zoom out of the picture keeping the individual faces in focus.
I find display effect the best using this we can still view the details of photos shot from a distance and at the same time able to see the individuals present. But this feature is available only for premium version of the app.
Photo Order
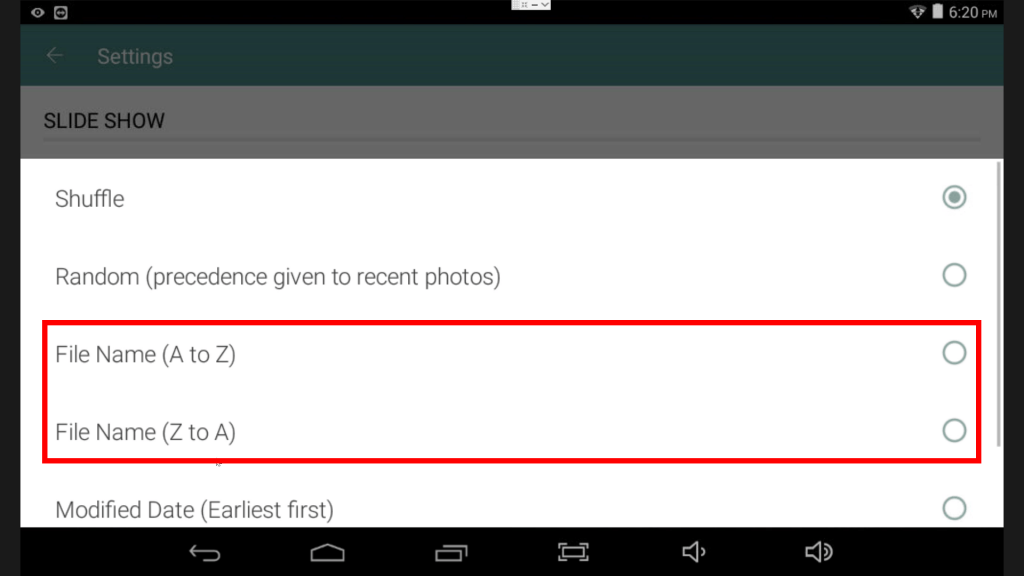
Now go back to the settings and then tap open the photo order settings. In this, I have found that only File Name (A to Z) and File Name(Z to A) covers the entire photo album. So select any one of the two. This issue might be due to a problem in google photos API.
Launch on Boot
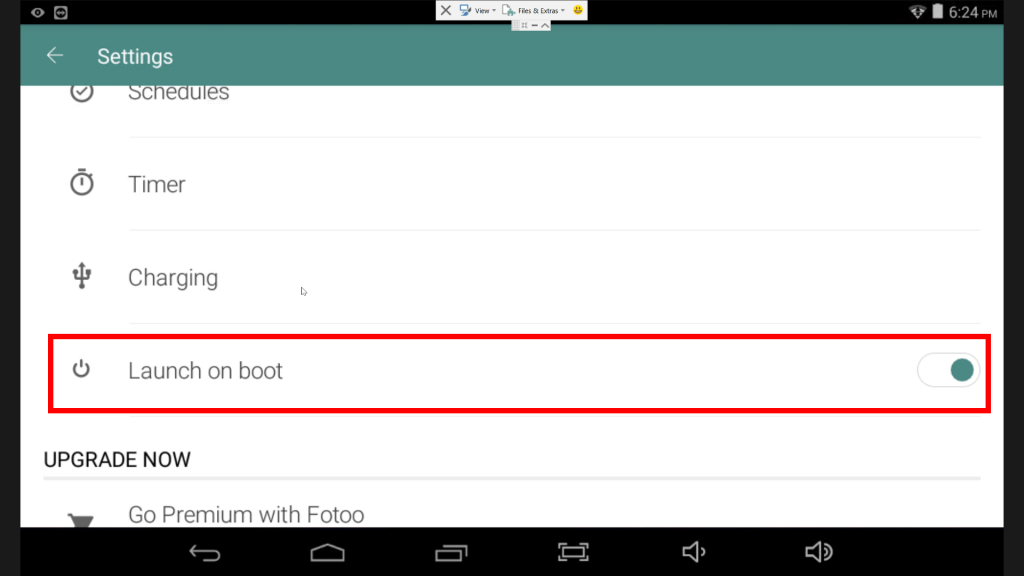
Again go back to the settings and scroll down to find the switch to enable launch on boot. If you are planing to use this android device as only a photo frame then this settings should be kept enabled as this saves the additional burden of turning on the Fotoo App each time the device boots up.
Screen Rotation
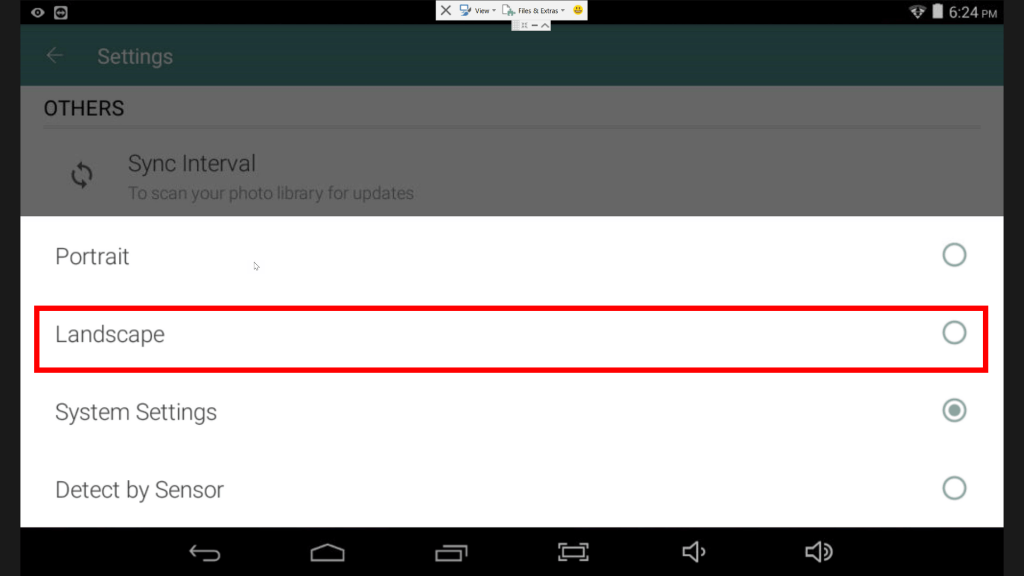
Go Back to settings and scroll down to find the Screen Rotation settings. Change it to landscape this will ensure irrespective of your device orientation the Fotoo app will always display images in landscape mode. As result providing a bigger screen to display for your photos.
Cache
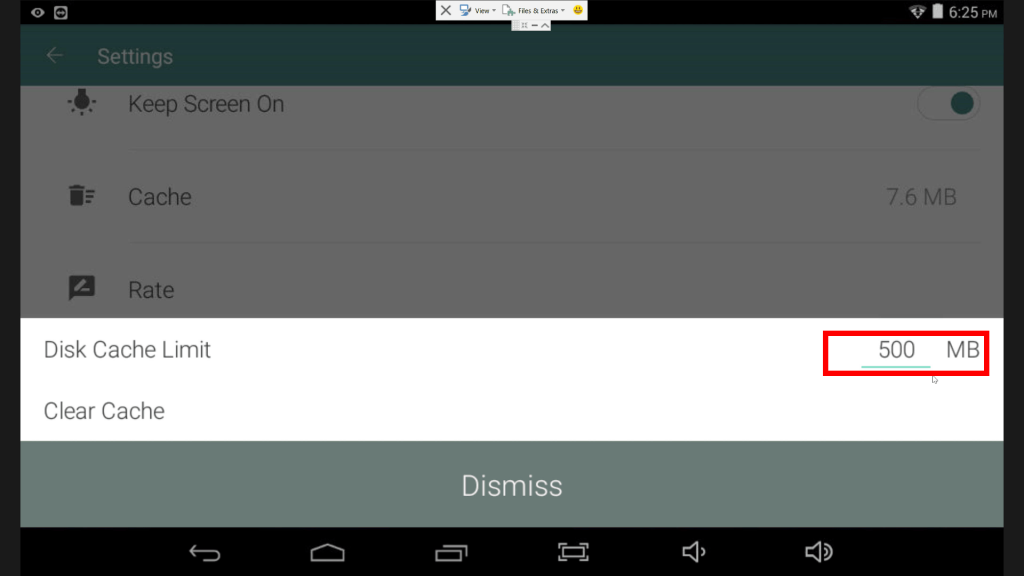
Go back and find the cache option just below the screen rotation settings open it. Depending upon your photo album size increase the cache so that all your photos can be saved locally on your device. This reduces your internet bandwidth usage by ensuring the Fotoo app only accesses google photos when a new photo has been uploaded in the album. For 2000 photos I increased my cache to 5 GB from the existing 500 MB.
Step 4: Sit back and Enjoy
Congratulations with these settings changes now you have successfully converted your old tablet into a useful smart digital photo frame which automatically gets updated with the photos of your loved ones. Now relax and enjoy as the photo frame reminds you of those happy moments.
Free Vs Premium Fotoo App
Premium App Only Features
Smart Focus Face Detect Display Effect: As mentioned before this single feature is good enough for switching to the premium version as this makes the picture slide show so good.
Background Music During Slide Show: If you want in the premium version you can play music while the picture slideshow running.
Limitation of Free Version
Continuous Photo Slide Show Not Possible: This is really irritating as the slide show pauses after 10 minutes and then resumes after a 30 seconds of countdown screen.
I strongly suggest you go for the premium version of this app as the features provided for the cost of $2 is very cheap.It will also help the developer to continue supporting this project and improving it over time.
Thanks for reading friends I hope you enjoyed this video article. If you are having problem during setting up your digital photo frame share it in the comments section. We will try our best to help you. Share your experience and idea with the community use our community forums. If your friends and family members would be interested in this article share it with them.
We at howisolve.com provide troubleshooting guides, tutorials, DIY projects, tips and tricks and much more. Subscribe to our newsletters to get email alerts when we release a new content. That is it, for now, see you later bye.


